Welcome back to our vSphere 9.0 Performance Tuning Series.
So far, we’ve fine-tuned hardware, CPU, memory, and storage. Now, it’s time to focus on the connective tissue of your virtual environment—the network.
In virtualization, networking isn’t just about physical NICs and cables. It’s a dynamic ecosystem of virtual switches, traffic shaping, and offload technologies working together to ensure smooth communication.
Today, we’ll dive deep into ESXi networking, explore advanced features, and share best practices for maximum throughput and minimum latency.
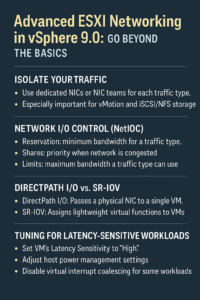
1. The Golden Rule: Isolate Your Traffic
One of the most important principles in ESXi networking is traffic isolation.
When multiple traffic types—such as management, vMotion, VM traffic, and iSCSI/NFS storage—share the same physical NIC, performance degradation is inevitable.
Best Practice: Use Dedicated NICs
For optimal performance and security, assign dedicated physical NICs (or NIC teams) to each traffic type, especially for high-bandwidth or latency-sensitive workloads like:
-
vMotion
-
iSCSI/NFS storage
-
vSAN
This prevents congestion and ensures each workload gets the bandwidth it needs.

When Dedicated NICs Aren’t an Option
On 10Gbps or faster links, sharing traffic is common. Fortunately, modern NICs support multi-queue technology, which helps separate traffic streams.
This is where Network I/O Control (NetIOC) comes in to balance and prioritize traffic.
2. Network I/O Control (NetIOC): The Virtual Traffic Cop
Think of NetIOC as QoS for your hypervisor. It’s a feature of the vSphere Distributed Switch (VDS) that allows you to:
-
Reserve bandwidth
-
Prioritize specific traffic types
-
Set limits on network usage
Key Configuration Options:
-
Reservation:
Guarantees a minimum bandwidth (in Mbps) for critical services.
Example: Ensure management traffic always has at least 500 Mbps. -
Shares:
Determines relative priority when the link is congested.
Higher share = higher priority. -
Limits:
Sets a maximum bandwidth cap for a traffic type.
Use cautiously—unused bandwidth will remain idle if set too low.
Pro Tip:
NetIOC is essential in converged environments where multiple traffic types share the same physical infrastructure.
3. High-Performance Networking: DirectPath I/O vs. SR-IOV
For workloads demanding ultra-low latency, bypassing the hypervisor’s virtual networking stack can provide a huge performance boost.
Two main technologies make this possible:
DirectPath I/O
-
Passes an entire physical NIC directly to a VM using Intel VT-d or AMD-Vi.
-
The VM uses the native NIC driver, reducing CPU overhead.
-
Ideal for single, networking-intensive workloads.
Single Root I/O Virtualization (SR-IOV)
-
A single physical NIC presents itself as multiple lightweight virtual functions (VFs).
-
Assign individual VFs to different VMs for parallel high-performance networking.
-
Perfect for multi-VM environments needing low latency.
Trade-Offs to Consider
While these methods deliver top-tier performance, they limit certain vSphere features:
-
❌ vMotion
-
❌ Snapshots
-
❌ Suspend/Resume
Use them selectively for specialized workloads like:
-
Network Function Virtualization (NFV)
-
High-frequency trading
-
Real-time analytics
4. Fine-Tuning for Latency-Sensitive Workloads
Some applications need microsecond-level network response times. Default ESXi settings prioritize throughput, so you’ll need to customize configurations for extreme performance.
Step-by-Step Tuning Checklist:
a) Enable “High” Latency Sensitivity for the VM
-
In VM settings, switch Latency Sensitivity from Normal → High.
-
What it does:
-
Assigns dedicated CPU cores (no hyper-threading).
-
Optimizes interrupt handling for minimal latency.
-
Note:
Requires 100% memory reservation.
Strongly recommended to also set 100% CPU reservation.
b) Adjust Host Power Management
-
CPU power-saving modes (C-states) add latency.
-
Set ESXi Power Policy to High Performance.
-
Disable C-states in BIOS for mission-critical latency-sensitive VMs.
c) Optimize the Virtual NIC
-
VMXNET3 is the preferred adapter for most workloads.
-
For certain low-packet workloads:
-
Consider disabling interrupt coalescing.
-
This increases CPU usage slightly but reduces latency.
-
5. Bringing It All Together
By now, you’ve:
-
Segregated network traffic
-
Implemented NetIOC for prioritization
-
Considered advanced offload options like DirectPath I/O and SR-IOV
-
Tuned ESXi for latency-sensitive applications
These strategies ensure a highly optimized, predictable, and resilient virtual network in vSphere 9.0.
What’s Next?
We’ve optimized everything up to the hypervisor layer.
In the next post, we’ll go inside the VM and cover:
-
VMware Tools best practices
-
Paravirtualized drivers for maximum performance
-
How to fine-tune vNUMA for multi-CPU VMs
Stay tuned—and let us know your favorite networking tips in the comments below! 💬
Final Thoughts
Advanced ESXi networking isn’t just about speed—it’s about efficiency, stability, and flexibility.
By applying these strategies, you’ll have the tools to:
-
Prevent network congestion
-
Reduce latency
-
Deliver a seamless experience for critical workloads
Your network is the backbone of your virtual infrastructure—treat it like one.


